Pycharm Development Environment
Before you can setup pycharm development environment, you need
A Linux environment with pre-requisite softwares. Please refer to Install virtual machine or WSL2 Ubuntu environment to setup one
Your own fork of relevant volttron repositories cloned in your Linux environment and poetry environment setup. Please refer to this doc for details
Pycharm is an IDE dedicated to developing python projects. It provides coding assistance and easy access to debugging tools as well as integration with py.test. It is a popular tool for working with VOLTTRON. Jetbrains provides a free community version that can be downloaded from https://www.jetbrains.com/pycharm/
Install Pycharm
- Pycharm can be installed two ways
Installed within the Ubuntu environment so it access code local to it and renders UI using a X Server.
Install on Windows host and set it up to connect to remote code in Ubuntu wsl environment. For the VOLTTRON use case, only Pycharm professional version would work for this type of install. This is because, Pycharm community edition would not allow you to point to a python interpreter within a virtual environment in the community
Installing pycharm-community on Ubuntu-22
Run the following commands to get the pre-requisites for installing and running pycharm
sudo apt-get install firefox(To download pycharm-community tar installer. Or you could download on windows and copy it into Ubuntu)run the command
firefoxto launch browser from Ubuntu, go to pycharm download page <https://jetbrains.com/pycharm/download> and download pycharm (community/professional) for LinuxUntar pycharm tar file in a easy to access location say $HOME/pycharm
Install the following dependencies for pycharm
sudo apt-get install libxrender1
sudo apt-get install libxtst6
sudo apt-get install libxi6
sudo apt install libfreetype6-dev
Optional: create an alias in ~/.bashrc that points to <pycharm untar dir>/bin/pycharm. Example:
alias pycharm='/home/user1/pycharm-community-2024.2/bin/pycharm 1>/dev/null 2>&1 &'
Installing pycharm professional on Windows and opening remote code
Download:
Open your preferred web browser.
Visit the official PyCharm website: [https://www.jetbrains.com/pycharm/download/?section=windows)
Under the “Professional” edition, click the “Download” button for Windows.
The .exe installer file will be downloaded.
Run the Installer:
Locate the downloaded file (usually in your “Downloads” folder) and double-click to run it.
If prompted by User Account Control, click “Yes” to allow the installer to make changes.
Follow the Setup Wizard:
Welcome Screen: Click “Next” to continue.
Choose Install Location: Accept the default location or click “Browse” to choose a different one. Click “Next”.
- Installation Options:
Create Desktop Shortcut: Recommended, check this box.
Update PATH variable (restart needed): If you want to be able to run PyCharm from the command line, check this box.
Associate .py files with PyCharm: Recommended, check this box so PyCharm opens when you double-click Python files.
Download and install JBR x86: This is the Java Runtime Environment needed for PyCharm. Leave this checked.
Click “Next”.
Choose Start Menu Folder: Accept the default or choose a different one. Click “Install”.
Installation Progress: Wait for the installation to complete.
- Completing the Setup Wizard:
Run PyCharm: Check this box if you want to launch PyCharm immediately after installation.
Click “Finish” to close the installer.
Open PyCharm and access the “Remote Development” menu.
Click the “Menu” / “File” button in PyCharm.
From the dropdown menu, select “Remote Development.”

Connect to WSL.
In the Remote Development window, choose “Connect to WSL.”
Continue the setup process.
Select your desired WSL instance (e.g., Ubuntu).
Specify the path within your WSL environment where you want to store the new project.
PyCharm will establish a connection to your WSL instance and prepare the project environment.

Your PyCharm IDE is now connected to WSL.
You should see your PyCharm interface with the project open in the WSL environment.
You can access a terminal within PyCharm to interact directly with your Ubuntu/WSL machine.

Pycharm Settings/Configurations
When launching Pycharm for the first time we have to tell it where to find the volttron-zmq source code. If you have already cloned the repo then point Pycharm to the cloned project.
Subsequent instances of Pycharm will automatically load the VOLTTRON project.
Note
When getting started make sure to search for gevent in the settings and ensure that support for it is enabled.
If you have already ran poetry install --no-root on your cloned volttron-zmq source directory, on opening the
volttron-zmq project in pycharm, pycharm should automatically detect this project as a poetry project and set the
python interpreter for this project as “<volttron-zmq clone dir>/.venv/bin/python”.
If you did not run poetry install on command line already, run this on command line to create a poetry environment, and then manually set the python interpreter path in pycharm. Pycharm needs this information to know which python environment it should use for running/debugging code and where to find dependencies.
You can set or verify the python interpreter path by going to the Settings menu under the File option in Pycharm.

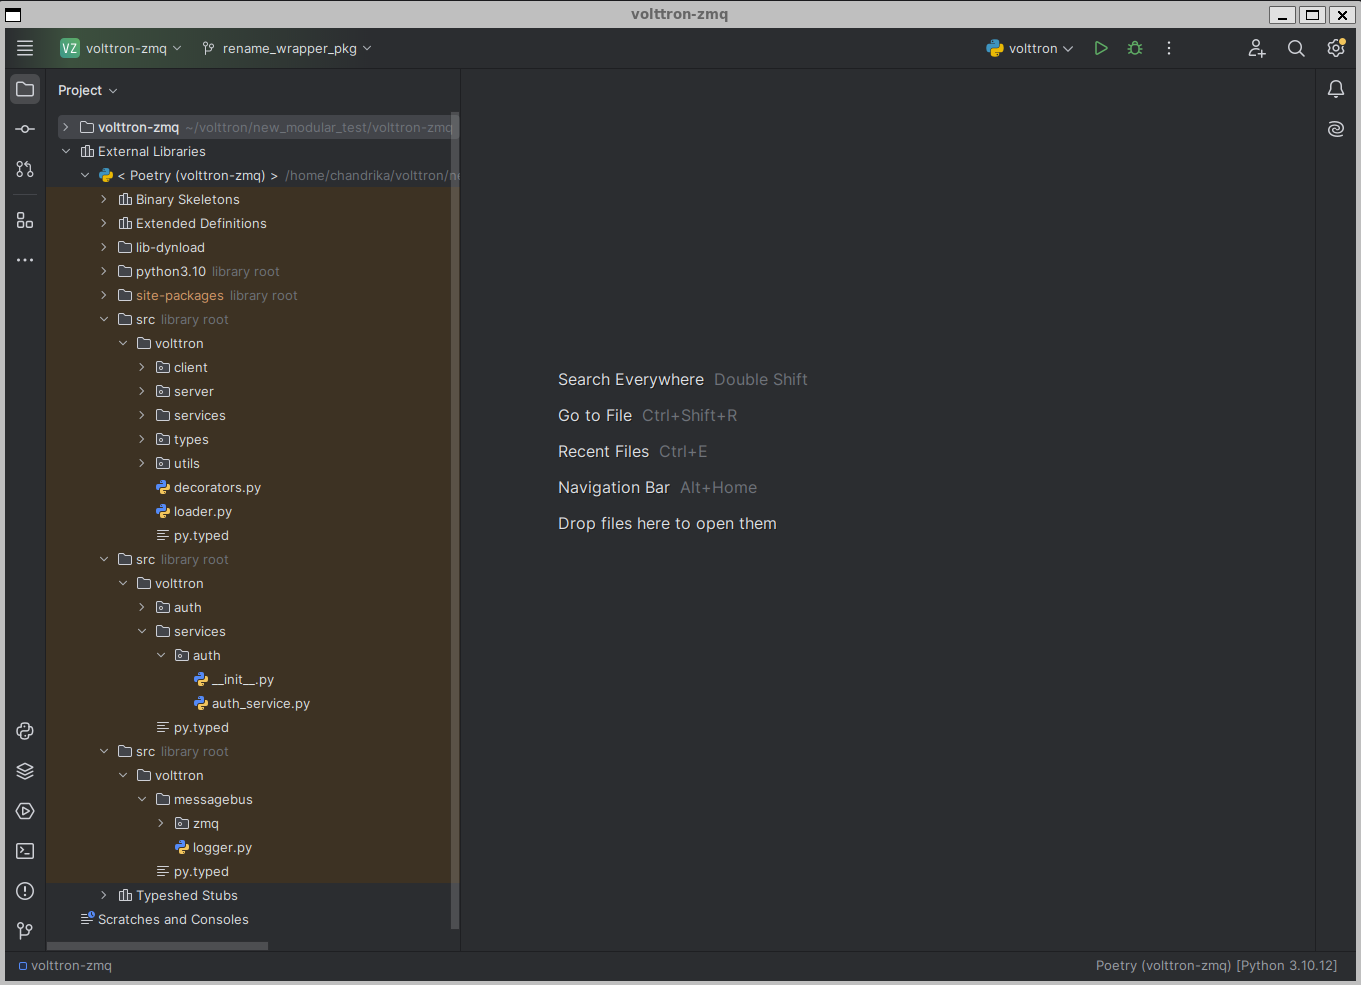
Once the python interpreter is set, pycharm will automatically show all the source code dependencies in pyproject.toml under External libraries. In the screenshot below you can see three “src” folders listed under external. This is because the example volttron-zmq repository used for this screenshot, had dependencies to volttron-core, volttron-lib-auth, and volttron-lib-zmq with all three dependencies pointing to the cloned source directories instead of pypi package
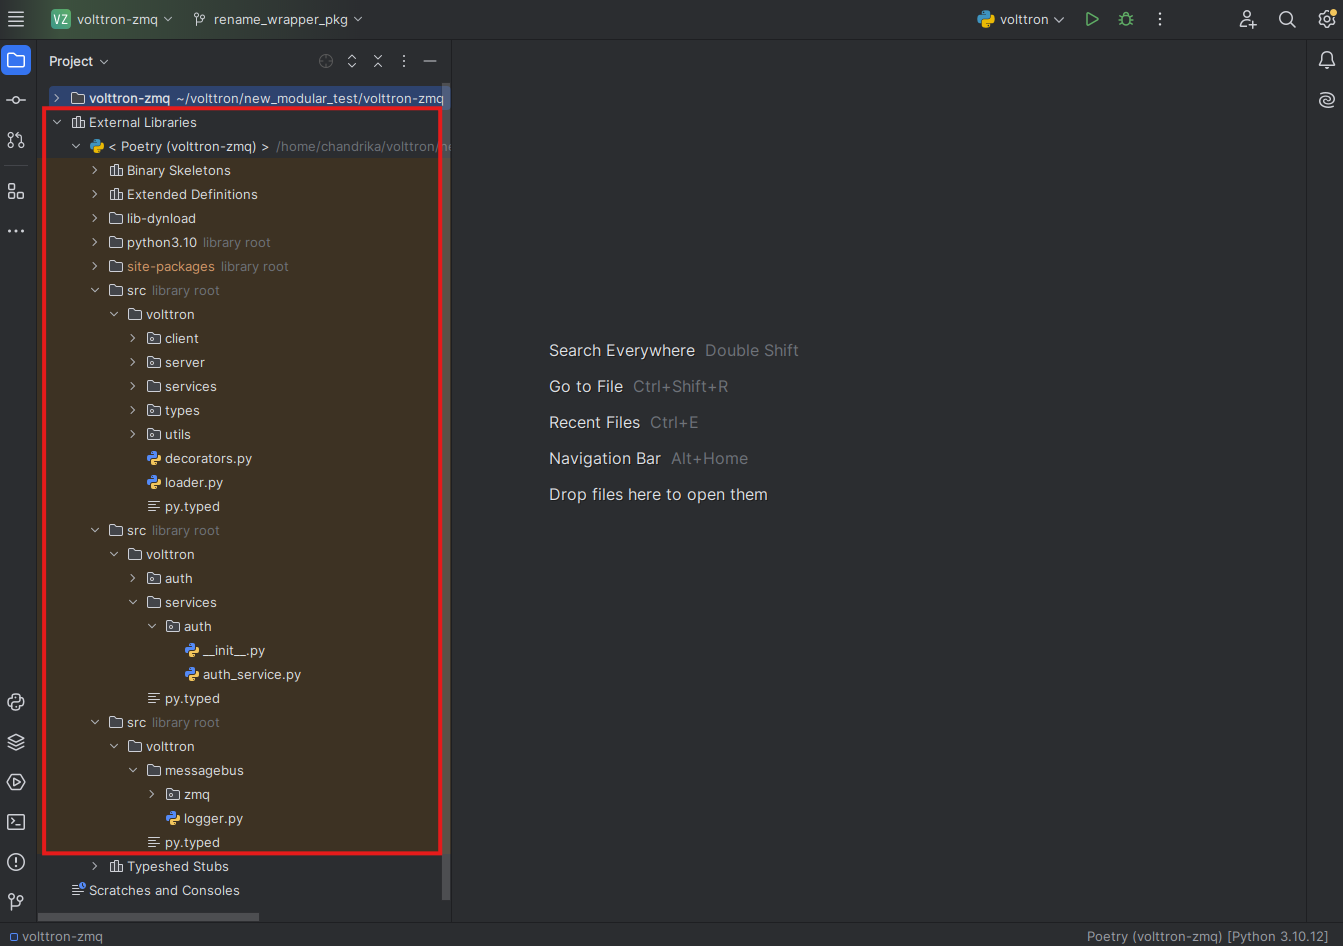
You could also explicitly add these source folders into pycharm so that they show up at the same level as volttron-zmq source as shown in the below image. This make it easier to indentify the repository to which the “src” folder belong.

To achieve the above, go to File -> Settings -> Project: volttron-zmq -> Project structure. Click on the “Add Content Root” and select the path to the cloned volttron-core, then right click on the “src” folder of volttron-core and select “Sources” to mark it as source dir. Repeat the same for volttron-lib-auth and volttron-lib-zmq

If you are not interested in running the VOLTTRON process itself in Pycharm then this step can be skipped.
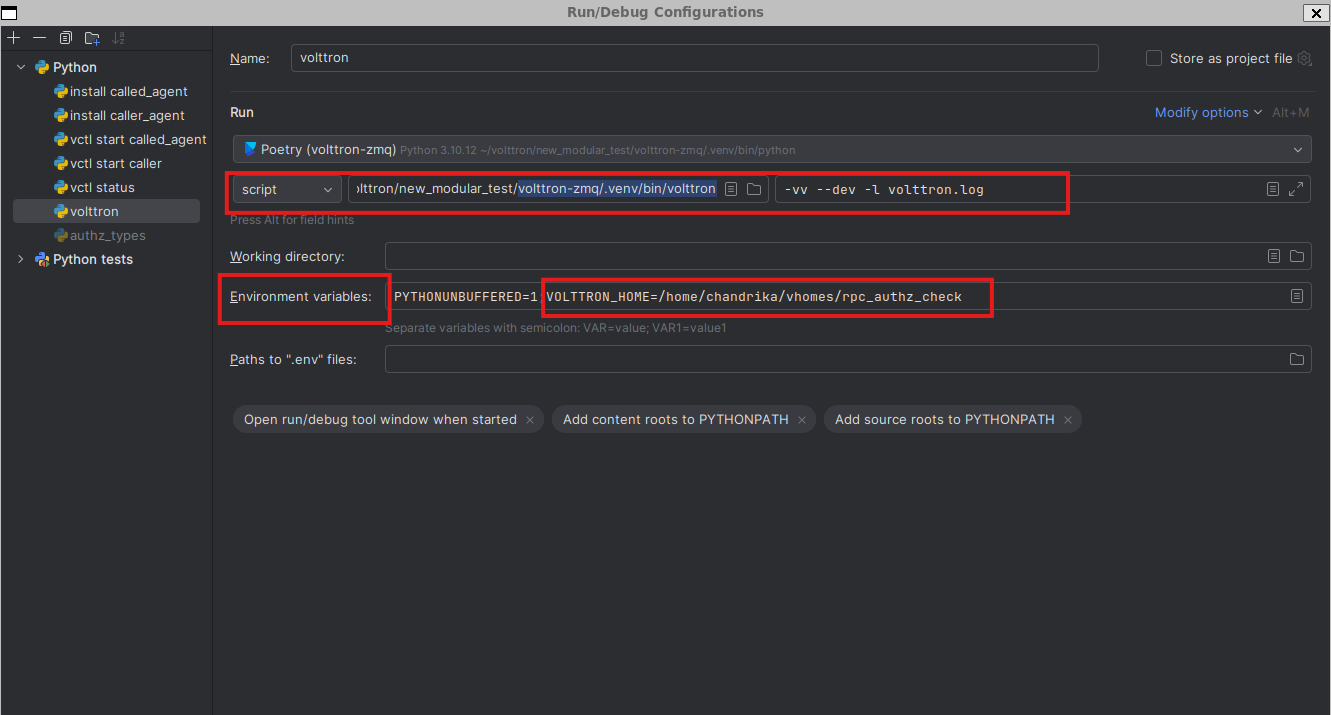
In Run > Edit Configurations create a configuration that has <your source dir>/.venv/bin/volttron in the script field and –dev in the script parameters field. You can append other optional parameters in the script parameter field after –dev. Set the working directory to the volttron-zmq directory.
Note
If you are using a VOLTTRON_HOME folder other than the default <user home dir>/.volttron make sure VOLTTRON_HOME environment variable is also set
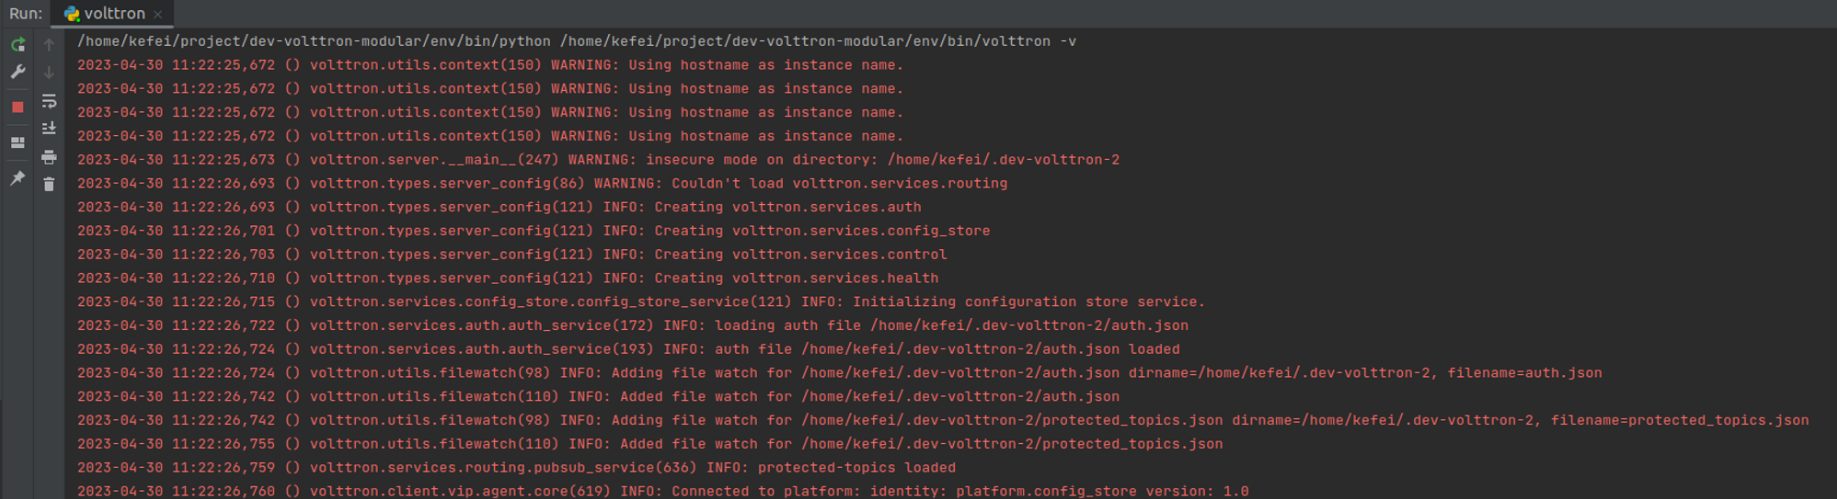
VOLTTRON can then be run from the Run menu or as shown in the image below

Result
Similarly you can create run configurations for vctl status, vctl install etc.